Showing posts with label diy. Show all posts

Friday, 29 August 2014

Soft and Cute

All of you would know that I've been working away making a crochet teddy bear for a sick friend, but I've also had this cute little project just sitting there, looking at me every day in my office. Yesterday I gave in, I started working on this cute little project and before I knew it, I was hooked!
In case some of you are wondering, the cute little project was a little felt soft toy, an elephant to be exact and she is the sweetest little thing I have created in a long time, even though my stitching is a little messy.
The little pack came with a printed template, simple instructions, a picture of the finished product plus all the materials needed.
Such a great way to break up all the crochet and brush up on my hand sewing skills. Might just have to have a look and see what else is available to make :-)
Happy creating :-)

Saturday, 14 June 2014

Simple Crochet Sock

Here is a great and simple crochet sock for beginners to start out with, it is a lovely warm sock that can be worn around the house instead of slippers. We used 1 x 250 gram ball of 12 ply yarn and a 4.5 mm crochet hook, and a wool needle. The design is still the same for any size hook and yarn and is made completely out of single crochet. We should note that we did not end up using the entire 250 gram ball, it is safe to say you can make one of these socks easily with a 100 gram ball.

First we started with the toes, now this is where the sock really truly becomes yours. Start with the slip knot, leave a tail a couple of inches long, then do a chain with as many links as it takes to measure roughly from your big toe to you little toe, make it fall perhaps 2 links short, this will enable the sock to be a little snug and not loose and floppy as you walk around. One thing we did with this sock is leave it square-toed, this way it doesn't matter which foot you put it on.

Once you have done the chain measuring across your toes, do single crochet back along that chain until you get to the end. When you get to the end link, do 6 single crochet into that one link, it should make a semi circle and bring you around and ready to crochet along the other edge of the chain. Again when you reach the last link of the original chain, do 6 single crochet into that one link. This is the only time, on this part of the sock, that you will need to do more than one single crochet in the same link/stitch.

It might look a little fiddly at first and then like a little bag but keep working and don't forget, you are measuring it against your own foot, so try it on. You will need it to reach the start of your heel, once you have made it this long you will need to work out which half is going to be the top half and then work only on the top half.

The sock, so far, will flatten naturally thanks to the first chain you made for the toes, this helps to find the top half of the sock to work on. Now you will need to work back and forth doing single crochet and missing the first stitch when doing each row (i.e, don't make a single chain and then go back into the stitch you made, instead go into the second stitch), this will make the rows slowly become smaller and give an almost triangle appearance. Yes you will get a slightly different pattern with your work, this is nothing to worry about, it actually adds a little something to the sock. From here, try the sock on and when the top half reaches just above your ankle, you start the next trick. Finish that row and then make another chain. You will need to try the sock on a few times to get this part right, but that's all part of the fun with making a sock specifically for you.

Soon as you have the chain long enough to reach around your ankle, making sure it is not too tight, continue on with single crochet, don't worry, it will go around in a spiral but will barely be noticeable. Only complete 2 rows and then try the sock on again to make sure that your foot will fit. If you are having a bit of trouble, pull back the stitches to the chain and add a couple more links. If you are finding it too loose, again, pull back to the chain and remove a couple of links.


Once you have it all comfortable and fitting well, continue on for 8 rows however long you like, as this will be the section that covers your leg, so if you only want little socks, probably do 5 rows, if  you want a sock to warm your ankle and a little more, do 8-12 rows. When you have finished, leave a couple inches to the tail, tie a knot to secure your work and put that piece aside for now.


What is a sock without a heel? We had better work on a heel now. We had tried starting with a circle but found it wasn't working the way we wanted, so same as the start of the toes, make a chain a little less than the width of your heel and, just like the toes go back over the chain with single crochet until you get to the last link, put 6 single crochet into that last link to bring your work around so you are ready to work on the other half of the chain, again when you get to the other end of the original chain, put 6 single crochet into that one link to turn your work. As per normal, singlet crochet around roughly 5 rows until the heel starts to take shape.


Try the heel on, don't be shy, you need to know it is fitting well. It should look like a little fabric bowl on your heel, notice how your heel isn't perfectly round like the heel you are making for your sock? Your crochet now needs a bit of adjusting from the heel to the underside of the foot and from the heel up the ankle/leg. Here is where you will learn to make little corners to change the shape of your heel. While wearing the heel, note where the underside of your foot meets the side of your heel, look at both sides and remember this. The next row of crochet will involve extra stitches in the place. When you find you are at one of these sections, do a single crochet then a single chain and then a single crochet again before continuing on with single crochet. Try the heel on again and this time, note what stitches are at either side of the back of your heel, these will need little corners like you have just learned.


When it comes to the next few rows, the single crochet, single chain, single crochet needs to be done in the previous single chain. Now it is time to put on the other part of the sock and then the heel, take a look at see if the front of the heel meets up with the underside of the sock, it should be close. Continue until these two just meet, this helps with the snug fit. Now there is a lot more to do on the sides and back of the ankle area, so forget going around the heel completely, instead, turn around when you get to the front of the heel as this is now the end of the row and work back, continue crochet like this for roughly 2 rows and then you will see that you need to shape the sides.


We found that after the final stitch, make a 2 link chain and go back into the 3rd stitch and start crocheting again from there, do this until the sides are complete and even, this should be about 6 rows but that depends on your foot after this there should only be a little left to complete which will be perhaps 3 rows which cover around the ankle and will join the heel to the band around the ankle/leg which you made on the other piece. When you try both these pieces on and you can see they will fit, it is then time to tie off on your work on the heel and this time be sure to leave a tail roughly 15 inch or 30 cm in length as you will use this with your wool needle to stitch the two pieces together, an easy way to thread your needle is to take your needle in one hand, loop the wool over once, pinch this tight over the needle, slide the needle out and hold it close to your pinched finger and thumb. Now slowly open up/roll back your finger and thumb a little and push the wool through your needle as you do so. From here the stitching is just a basic stitch remembering to keep it tight.


One sock completed, one to go, we do apologise for the photo, it was taken before the lounge was found after moving.
We hope you enjoyed this post, feel free to comment or ask for more information, if you like, feel free to share :-)

Saturday, 7 June 2014

How to Crochet - Single Crochet

For those of you who have never picked up a crochet hook in your lives, we’ll run through a beginner course for you before we give instructions on how to make a scarf in a later post.
You will be needing a crochet hook, generally a 4mm hook works well for most projects and can be bought from just about any wool supplier either online or in store, also some yarn/wool (4 ply or 8 ply works well) or crochet thread and you will also need a pair of scissors.

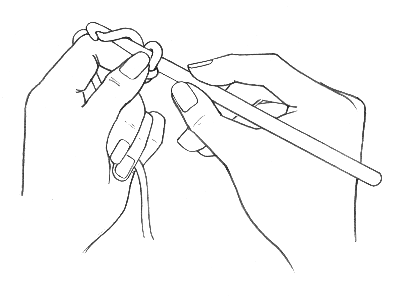
Next you need to learn how to hold the hook and the yarn, find what works best for you.
There is the Knife Grip, which as the name suggests is the same way you would hold a dinner knife and there is the Pencil Grip, same way you hold a pencil. We have noticed that everyone holds both a knife and a pencil differently to everyone, so there is no right or wrong way to use the Pencil or Knife grip, go with what feels most comfortable to you. 
If you find yourself holding the crochet hook too tightly or you have arthritis and your fingers perhaps don't grip the crochet hook as well as they could, it might be worth looking at purchasing a crochet hook handle, these come in various sizes, shapes, textures and colours and are designed to make crocheting more comfortable for you. Again you can find these at most yarn/wool suppliers, including the suppliers we listed in our previous post.

Next step is making a slip knot which will be the start of your crochet. We found it easier to share with you step by step pictures, rather than try and tell you how to do a slip knot.


How to hold the yarn when crocheting.
Again this varies from person to person, go with what is most comfortable.


We use a basic hold which is found in diagram 3, but we include in the right hand, holding the loose tail as it tends to spin and wrap itself around the hook and make it difficult to get started. Once the crochet starts to grow, we often hold what we are working on with both hands depending on the size of the item being made. It does sound complicated at first but have a little patience, find what works for you and go for it.

Once you have worked out your grip and how to hold the yarn, you'll need to learn how to make a chain. This is the fun and easy part, here you'll work out your tension and perfect it. With your hook in your right hand, yarn in your left hand, hook still in the slip knot you made, you now need to hook that string of yarn from your left hand and bring it back through the slip knot. That's it. Take a look at the diagram below to see how simple this step is. You can do as many links in the chain as you like, have fun.


If you don't like the look of your chain, perhaps some links are tighter than others, it is very easy to pull them back (remove them). Take the hook out of the chain and pull the yarn back to where you want or even back to the slip knot. Put the hook back in the chain you want and work from there.
Your chain should look something like the image below.


From here you can then practice doing Single Crochet, we'll also give you an example of the abbreviations you'll learn.


Doesn't look to make much sense does it? You can almost work it out from the diagram though. 
Step 1) When you are changing from the chain to the single crochet, you generally put the hook through the second chain/stitch from the end chain/stitch (the chain/stitch the hook is in) otherwise the edge will look narrow and tight. 

Step 2) So after putting the hook through the second chain/stitch (st) wrap the yarn over (yo) and pull the hook back through the stitch (st)

Step 3) Your crochet hook should then have 2 stitches on it again. Yarn over the hook (yo) and pull the hook through both loops (lps) on the hook so you have just one stitch on the hook.

You can make a scarf this way, using single crochet, grab yourself some multi-coloured yarn and it can end up looking wonderful. Practice by making a chain of 20 stitches and then start going back and forth doing single crochet as shown in the diagram above.

We'll teach you another stitch in our next post on crocheting. 

We hope you liked this post, feel free to share and if you have any feedback or would like to know more, please leave us a comment.


Wednesday, 4 June 2014

Top 10 Winter Warmers You Can Make

Who doesn't like to snuggle under a nice warm blanket in Winter? And with utility prices on the rise, all the more reason to make or purchase your own Winter warmers. 

If you are someone who like originals or personalized items then read on. This post is all about handmade items perfect for Winter and you don't need to be a genius to make them, all you need is the right tools and plenty of time, if time is against you then never fear, we have listed some wonderful businesses who can help you out.

So we've had a think and the top Winter warmers for anyone to go at with either knitting or crochet are:

Beanie
Blanket
Scarf
Mittens
Gloves
Socks
Leg Warmers
Headband
Ear Warmers
Boots

Over the next few weeks we'll do posts on several of these Winter warmers listed.
Scarves and blankets are the best starting place when learning knitting or crocheting, they can be as simple or as creative as you like. There are loads of different types of wool to use (we say wool as it is easier and simpler to say than all the mixed blends that are available) and of course 100% wool is the warmest but it can also be the more expensive.


Knitting
WikiHow has great step by step movies on how to hold your needles, cast on and knit Garter stitch. There are a whole range of stitches you can learn which can create some very intricate patterns. Depending on what ply (thickness) of wool you are working with, determines how wide the knitting is going to be. For a scarf, generally 8 ply and 20-30 stitches per row is a good starting point.

Knit 2 Purl 2
Knit 2 Purl 2
Knit 2 Purl 2

Crochet 
Instead of using needles, crochet uses a single hook and as with knitting needles, the size depends on the wool you are working with. Again WikiHow comes to the rescue to help you learn the basics of crochet.


If you are going to teach yourself to knit or crochet then a good idea would be to join a group/guild, online ones are fantastic for sharing patterns, tips and ideas not to mention finished projects, meeting in person is also fantastic as you can pick up even more tips from watching others knit and hearing advice that may not be included in the pattern instructions.

Some Australian suppliers include:

House of Yarn
NeedleNook Knitting Wool
A Yarn in the Making
Dormani Yarns
The Wool Shack
Knitting Yarn Shop
Yarn + Co
Morris and Sons
Wool Baa
Black Sheep Wool 'n' Wares
The Wool Inn
The House of Wool
Woolshed
The Wool Shop
Yarn Glorious Yarn
Yarnover
Kaalund Yarns
Yay for Yarn
Wool Suppliers
Tasmanian Fibre
White Gum Wool

If you are someone who doesn't have a lot of time but would like a unique Winter warmer we did locate one fantastic business so far that can help you, Knit 2 Purl 2 is a very experienced business making all kinds of Winter warmers. You can take a look at their wonderful business listing here.

Knit 2 Purl 2
We hope you have enjoyed our post on Winter warmers, if you have anything to add such as pictures of your own creations or if you would like to know more information, please leave us a comment :-)


Saturday, 17 May 2014

Purse Templates

We came across these fantastic images below, of cute little purses and templates to go with them. Sure you will agree they are just a little bit cute and you can make them as fancy or as simple as you like. Great for storing away all those coins.